back to homepage of Patek style tenor banjo
Playing in octaves
The text below is based on my February 2011 article at Banjo Sessions.
While there are tons of guitar instructions for octaves published or available on YouTube, I haven’t seen any banjo related tutorial on octaves. It is clear that banjos have limited range in comparison to guitar; nevertheless there is still the opportunity that you may become the “Wes Montgomery” of banjo world. You can play longer stand-alone octave phrases, or you can just spice up other playing techniques (bluegrass rolls, Travis picking etc.) with some octave pinches.
Wes Montgomery (who did far more for guitar than just popularizing the octaves as you can learn e.g. from sample pages of Corey Christiansen’s book Essential Jazz Lines in the Style of Wes Montgomery published by Mel Bay) used the following fingerings of the octaves on his guitar in standard tuning. [Fretboard charts are positioned with horizontal strings and vertical frets, left hand fingers are abbreviated as I, M, R, L].
Wes Montgomery strummed the octaves with his right thumb across three strings, while he muted the middle string by angling his left index finger. Some guitar players pick the octaves with right hand pinches – with thumb + finger or with flatpick + finger.
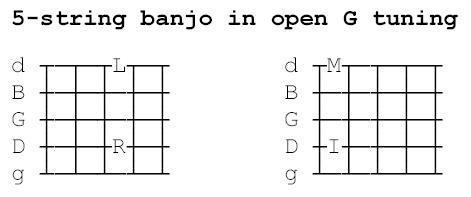
The following picture shows the fingering of octaves on 5-string banjo. On the 5-string banjo in standard open G tuning, the first (d) and fourth (D) strings are one octave apart. It means the octaves are voiced on the same fret of D and d strings. The position of ring and little finger in the first chart is familiar for 5-string banjo players as it is part of the F-shape as well as D-shape of major chord. The second chart shows the voicing with index and middle finger that can be used for alternation with the previous voicing in order to diminish a bit the amount of left hand position shifts up and down the neck. Another option (not shown) is the fingering with the middle and ring finger (as part of down the neck C-shape) - but this excludes the alternation with the other pair of fingers.
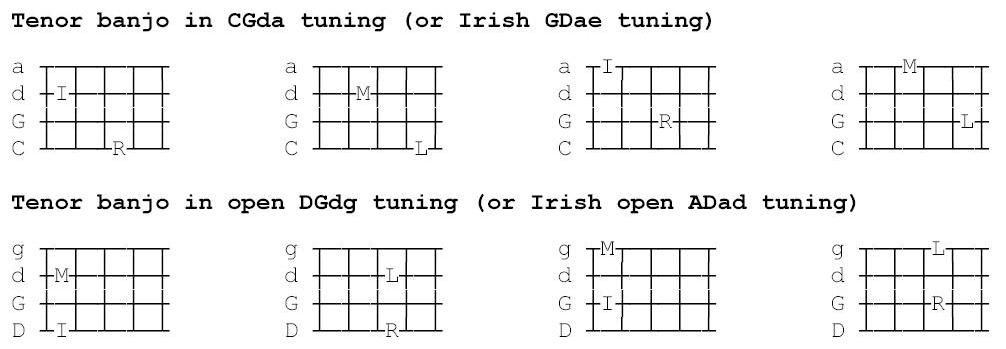
The third picture shows the fingering of octaves on tenor banjo. The first line is for the standard tuning in fifths (CGda, but it applies also to low Irish tuning GDae). Here the octaves are again two frets apart, as in lower strings of guitar, but in opposite direction. I am not sure whether strumming over three strings with the middle one muted by angled ring or little finger would be sufficiently pleasant, so one could try also the pinches mentioned above (with flatpick + middle finger or even with thumb + some finger). The second line shows my approach; my primary tenor banjo tuning is open DGdg and I fingerpick the strings, which brings me closer to 5-string banjo octave voicings on the same fret.
Usual remark: the retuning from CGda to DGdg neither requires string change nor it harms the strings; it means just loosening the thinnest string by whole note (what a relief) and tightening the thickest string by whole note (no problem). The same applies for GDae => ADad retuning. So, don’t worry and go ahead.
My DGdg tenor banjo has similar range of octaves as the 5-string banjo in open G tuning. The lowest octave D-d is the same on both instruments, the highest fretted octave is c’-c” on 22nd fret on 5-string banjo, and even d’-d” on 19th fret of DGdg tenor banjo. The fact that I have two pairs of octave strings (not only D-d, but also G-g) significantly reduces the left hand position shifts, but 5-string banjo players can get also nice octave motives from their D-d strings – especially if they use two pairs of fingers: I+M and R+L. However, the following examples will be focused on tenor banjo in DGdg tuning.
Right hand pinches
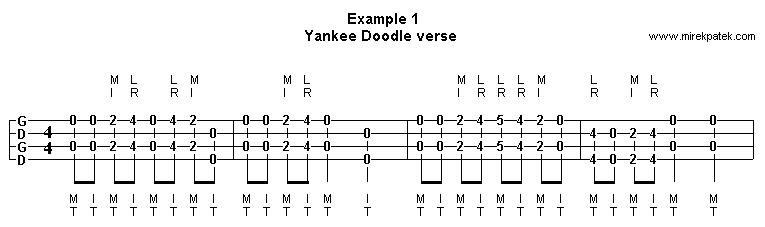
With the plastic thumbpick and metal fingerpicks on index and middle fingers, the octaves are played as pinches of thumbpick and one of the fingerpicks. Thumbpick plays all the notes on lower pair of the strings, for the thinner strings there is some freedom to choose between index and middle finger. The starting rule may be the middle finger on the first (g) string and index finger on the second (d) string, but in case of quicker octaves on the same pair of the strings it might help to alternate both index and middle finger on the same string as in the Example 1. [Right hand fingering is under the tab, left hand fingering is above the tab.]
The repetition of your thumbstrokes might be difficult at the beginning, but with practice it becomes easier. In case of really high tempo you may either cheat with your thumb by playing only the odd notes (that means the even notes will in fact not be octaves) or play some notes with the left hand techniques.
Left hand techniques
When playing octaves on DGdg tenor banjo (or on 5-string banjo in open G tuning), the left hand fingers work in two pairs: index + middle finger form one unit, and ring + little finger create the other unit. They fall simultaneously to the fretboard, they move similarly when playing vibrato (like the violin players) which can further enhance the sound of octaves, and also the slides, hammer-ons, and pull-offs are doubled.
Practice the double slides with both pairs of right hand fingers (I+M, and R+L) and in both directions (sliding up to the higher note, or sliding down to the lower note). As usual with slides, take care for the correct timing – distinguish the situation where the first octave is regular note with its own duration (keep it, do not rush the slide to the second octave) and the other case where the first octave is just the ornament (grace note without specific length) of the second octave. You can also use successive slides in opposite directions returning to the same notes; if it is played quickly as an ornament, it is called mordent (not shown).
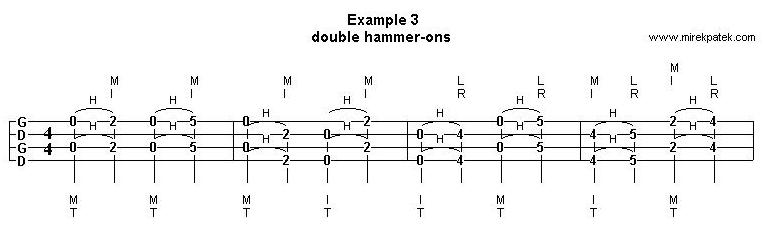
Similarly, the hammer-ons in octave playing are double hammer-ons. Practice the double hammer-ons with both pairs of right hand fingers. I+M fingers can play just the double hammer-on from open to fretted notes; R+L fingers can play also the double hammer-ons from notes fretted by I+M to another fretted notes. Practice also the alternate strings hammer-ons, where the hammer-ons are performed on other pair of the strings that has been pinched by right hand (2nd measure of Example 3).
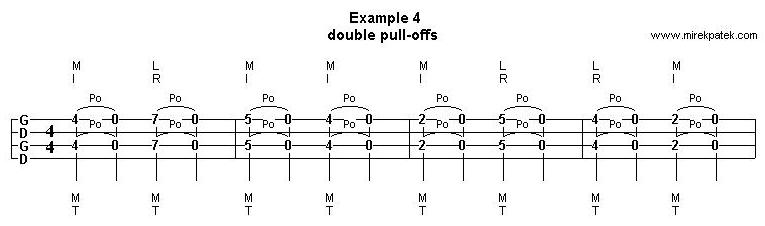
Finally, the pull-offs/push-offs (terminology indicates whether the left hand fingers pluck towards the palm or out of the palm) are done with the pair of left hand fingers simultaneously. The Example 4 does not cover the pull-offs with R+L fingers to the notes fretted with I+M fingers, neither it shows alternate strings double pull-offs. Instead, the example introduces the topic of shifting position of left hand, discussed in the next chapter.
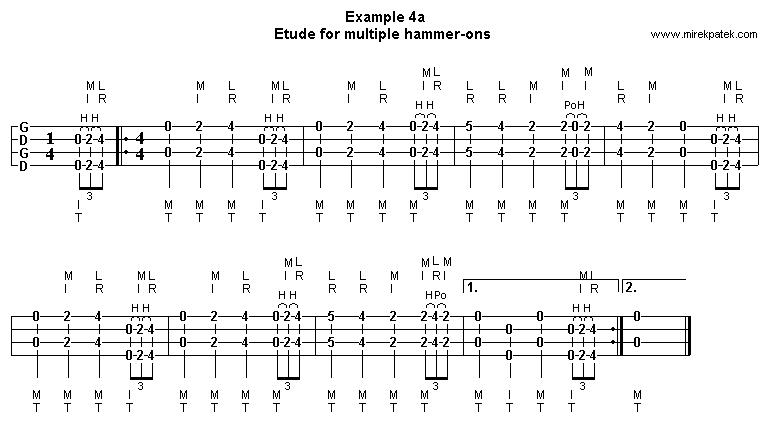
If there is a need to produce chain of left hand notes (e.g. two successive hammer-ons, hammer-on + pull-off, or pull-off + hammer-on), we have to face this limitation: while we have four left hand fingers for single notes, for the octaves we do have just two pairs of left hand fingers. So the amount of successive left hand notes (e.g. hammer-ons) is limited. It helps if the open strings (D-d or G-g) are involved as in the Example 4a.
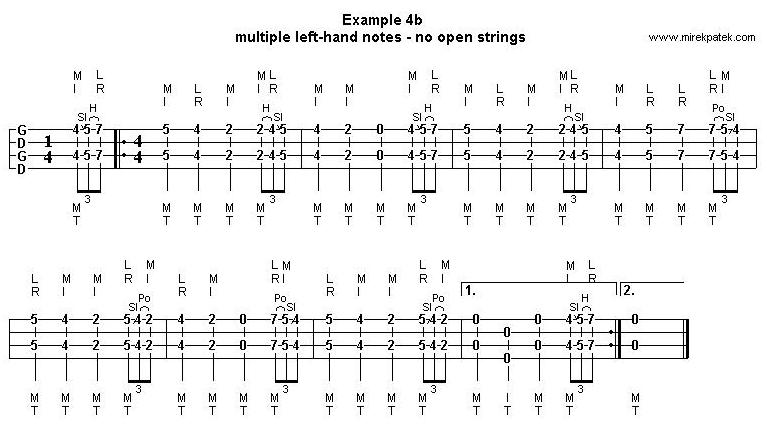
If there is no possibility to involve open strings into such ascending chain of three pairs, I would opt for the combination of slide + hammer-on for half note + whole note chain, and hammer-on + slide for whole note + half note chain. Similarly, in descending chain I would combine pull-off and slide in the same logic: slide for half note, pull-off for whole note - see Example 4b.
Shifting the position of left hand
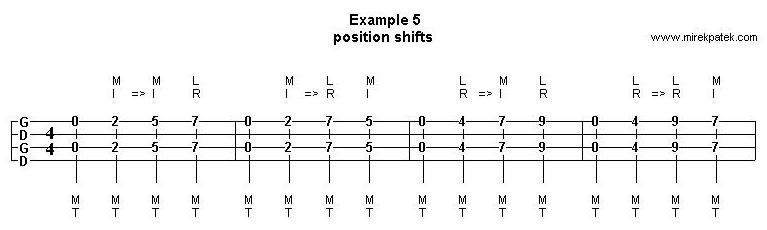
In the 1st-2nd measure of the Example 4 the left hand is serving the area of 4th-7th fret, while in the 3rd-4th measure it is down the neck (yes, that’s the common terminology: down the neck means close to the nut, up the neck goes closer to the bridge) in the area of 2nd-5th fret. These areas are called positions and between the 2nd and 3rd measure the left hand performs the position shift. Generally, there are eight kinds of shift possible in terms of direction and starting/ending pairs of fingers: I+M up to I+M; I+M up to R+L; R+L up to I+M; R+L up to R+L; I+M down to I+M; I+M down to R+L; R+L down to I+M; R+L down to R+L – see the Example 5, each measure is separate exercise, play it in both directions.
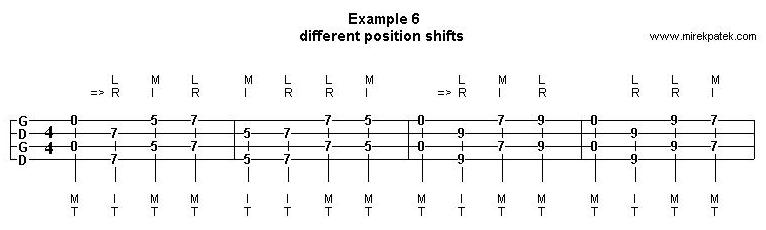
Usually there are different position shifts available for the given melodic fragment, especially in terms of timing – one can perform the position shift earlier or later in the tune. Example 6 shows some alternate ways of position shifts for the same melodic line as in Example 5; note that the left hand moves earlier up the neck. The choice of the timing of position shift is influenced not only by the placement of given notes on the fretboard, but also by the rhythm (e.g. you may prefer to shift your left hand after a longer note) or by particular phrasing.
Fretboard charts
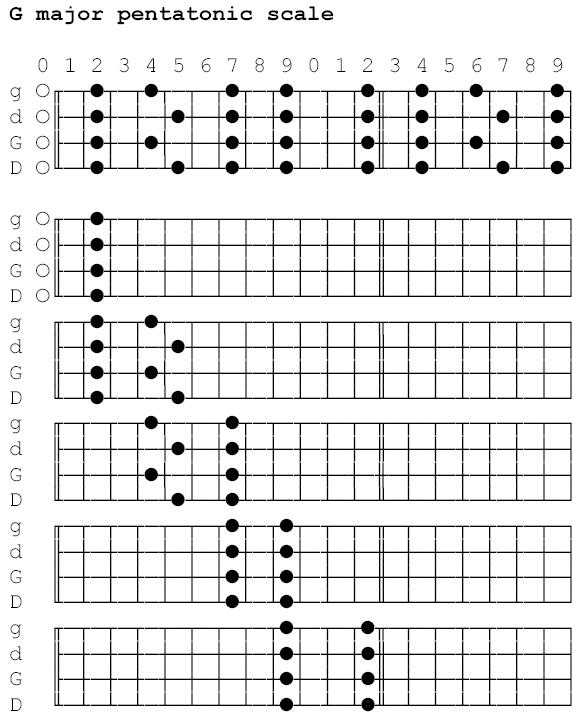
For memorizing the positions on the neck it might help to draw the notes of particular scale into the fretboard chart and focus on different positions and their visual shape. The picture below shows the G major pentatonic scale on the DGdg tenor banjo fretboard up to the 19th fret, followed by the separation of five different positions in the first octave; these shapes then repeat in the upper octave between 12th and 19th frets. Every box (that’s the term used by guitar players) contains four notes of the pentatonic scale and you should woodshed each box separately and the position shifts too.
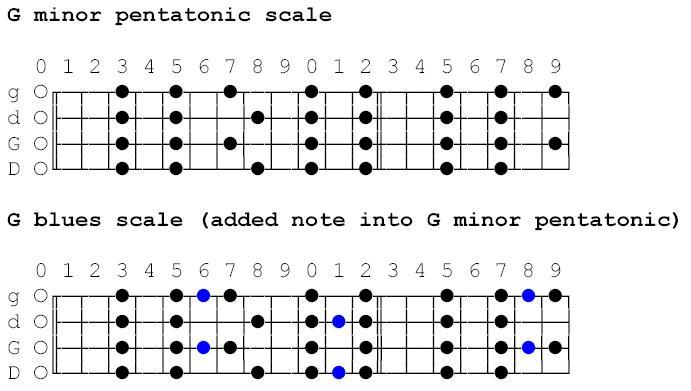
Similar fretboard chart (without separation of positions) is shown below for the G minor pentatonic scale, and for the hexatonic (six-note) blues scale which is born by adding one more note to minor pentatonic scale.
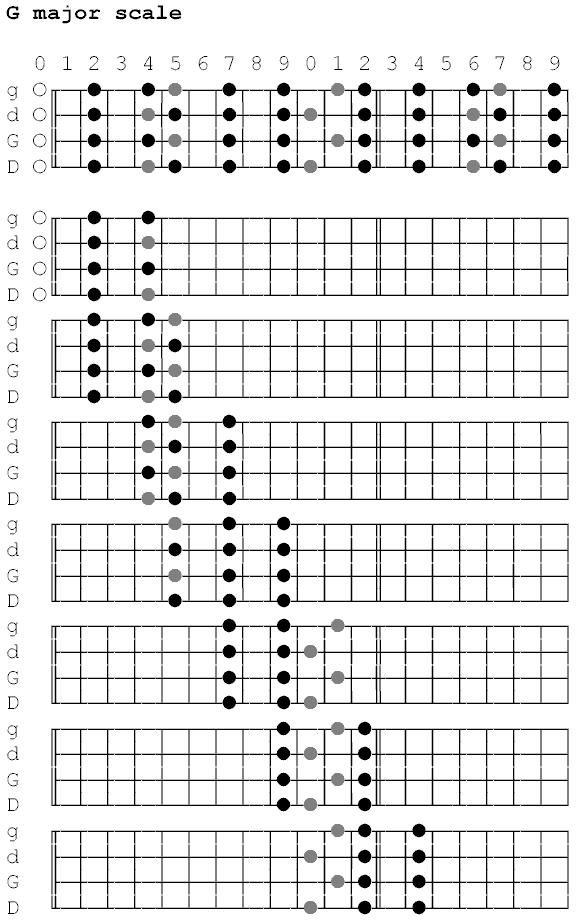
Finally, here is the fretboard chart with the G major scale, together with the separation of the segments which contain six out of seven notes of the scale (three notes per string). As we have just two pairs of left hand fingers (I+M and R+L) for the voicing of octaves, some stretching or position shifting is necessary also inside these segments – those boxes where you just stretch one of the finger pairs by halfnote are more comfortable than the others.
Again, you can work out the octave sounds contained in each segment and practice the shifts between those segments. Then, as you would expect, you should transpose these segments also to other keys, including minor ones. Ultimately, your goal is to make these position shifts intuitively as you are playing your melodic motive in octaves. Impress and have fun!